[Next] [Previous] [Top] [Contents] [Index]
VxVM System Administrator's Guide
VxVM Performance Monitoring
Chapter 2
Introduction
Logical volume management, as provided by VxVM, is a powerful tool that can significantly improve overall system performance. This chapter contains performance management and configuration guidelines that can help the system administrator benefit from the advantages provided by VxVM. It provides information needed to establish performance priorities and describes ways to obtain and use appropriate data.
The following topics are covered in this chapter:
Performance Guidelines
This section provides some guidelines on how to take advantage of various Volume Manager features. VxVM provides flexibility in configuring storage to improve system performance. Two basic strategies are available for optimizing performance:
- Assigning data to physical drives in order to evenly balance the I/O load among the available disk drives
- Identifying the most-frequently accessed data and increasing access bandwidth to that data through the use of striping and mirroring
VxVM also provides data redundancy (through mirroring and RAID-5), which allows continuous access to data in the event of some sort of disk failure.
Data Assignment
When deciding where to locate file systems, a system administrator typically attempts to balance I/O load among available disk drives. The effectiveness of this approach may be limited by difficulty in anticipating future usage patterns, as well as an inability to split file systems across drives. For example, if a single file system receives most of the disk accesses, placing that file system on another drive will only move the bottleneck to another drive.
Since VxVM provides a way for volumes to be split across multiple drives, a finer level of granularity in data placement can be achieved. After measuring actual access patterns, the system administrator can adjust file system placement decisions. Volumes can be reconfigured online after performance patterns have been established or have changed, without adversely impacting volume availability.
Striping
Striping is a way of "slicing" data and storing it across multiple devices in order to improve access performance. Striping can provide increased access bandwidth for a plex. Striped plexes exhibit improved access performance for both read and write operations.
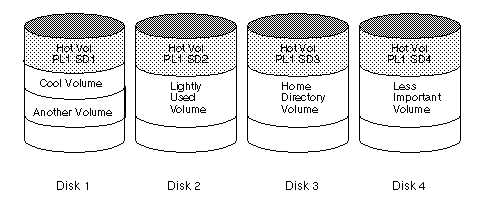
If the most heavily-accessed volumes (containing file systems or databases) can be identified, then significant performance benefits can be realized by striping this "high traffic" data across portions of multiple disks, thereby increasing access bandwidth to this data.
Figure 27 is an example of a single volume (Hot Vol) that has been identified as being a data access bottleneck. This volume is striped across four disks, leaving the remainder of those four disks free for use by less-heavily used volumes.
Figure 27 Use of Striping for Optimal Data Access
Striping Guidelines
Follow these guidelines when using striping:
- Never put more than one column of a striped plex on the same physical disk.
- Calculate stripe unit sizes carefully. In general, a moderate stripe unit size (such as 64K, which is also the default used by
vxassist) is recommended. If it is not feasible to set the stripe unit size to the track size, and you do not know the application I/O pattern, it is recommended that you use 64 kilobytes for the stripe unit size.
Note: Many modern disk drives have "variable geometry," which means that the track size differs between cylinders (i.e., outer disk tracks have more sectors than inner tracks). It is therefore not always appropriate to use the track size as the stripe unit size. For such drives, use a moderate stripe unit size (such as 64K), unless you know the I/O pattern of the application very well.
- Volumes with small stripe unit sizes can often exhibit poor sequential I/O latency if the disks do not have synchronized spindles. Generally, striping over non-spindle-synched disks performs better if used with larger stripe unit sizes and multi-threaded, or largely asynchronous, random I/O streams.
- Typically, the greater the number of physical disks in the stripe, the greater the improvement in I/O performance; however, this reduces the effective mean time between failures of the volume. If this is an issue, striping can be combined with mirroring to provide a high-performance volume with improved reliability.
- If only one plex of a mirrored volume is striped, be sure to set the policy of the volume to
prefer for the striped plex. (The default read policy, select, does this automatically.)
- If more than one plex of a mirrored volume is striped, make sure the stripe unit size is the same for each striped plex.
- Where possible, distribute the subdisks of a striped volume across drives connected to different controllers and buses.
- Avoid the use of controllers that do not support overlapped seeks (these are fairly rare).
The vxassist command automatically applies and enforces many of these rules when it allocates space for striped plexes in a volume.
Mirroring
Mirroring is a technique for storing multiple copies of data on a system. When properly applied, mirroring can be used to provide continuous data availability by protecting against data loss due to physical media failure. The use of mirroring improves the chance of data recovery in the event of a system crash or disk failure.
In some cases, mirroring can also be used to improve system performance. Mirroring heavily-accessed data not only protects the data from loss due to disk failure, but may also improve I/O performance. Unlike striping, however, performance gained through the use of mirroring depends on the read/write ratio of the disk accesses. If the system workload is primarily write-intensive (for example, greater than 30 percent writes), then mirroring can result in somewhat reduced performance.
To provide optimal performance for different types of mirrored volumes, VxVM supports the following read policies:
- The round-robin read policy (
round), in which read requests to the volume are satisfied in a round-robin manner from all plexes in the volume.
- The preferred-plex read policy (
prefer), in which read requests are satisfied from one specific plex (presumably the plex with the highest performance), unless that plex has failed, in which case another plex is accessed.
- The default read policy (
select), which selects the appropriate read policy for the configuration (selecting preferred-plex when there is only one striped plex associated with the volume and round-robin in most other cases).
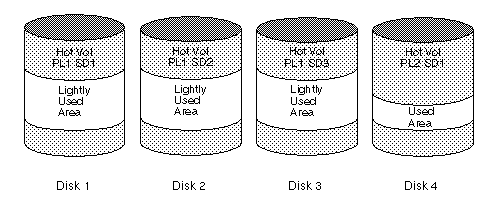
In the configuration example shown in Figure 28, the read policy of the volume labeled Hot Vol should be set to prefer for the striped plex labeled PL1. In this way, reads going to PL1 distribute the load across a number of otherwise lightly-used disks, as opposed to a single disk.
Figure 28 Use of Mirroring and Striping for Improved Performance
To improve performance for read-intensive workloads, up to 32 plexes can be attached to the same volume, although this scenario results in a decrease of effective disk space utilization. Performance can also be improved by striping across half of the available disks to form one plex and across the other half to form another plex; when feasible, this is usually the best way to configure the Volume Manager on a set of disks for best performance with reasonable reliability.
Mirroring Guidelines
Follow these guidelines when using mirroring:
- Never place subdisks from different plexes of a mirrored volume on the same physical disk; this action compromises the availability benefits of mirroring and significantly degrades performance. Use of
vxassist will preclude this from happening.
- To provide optimum performance improvements through the use of mirroring, at least 70 percent of the physical I/O operations should be reads; a higher percentage of read operations results in a higher benefit of performance. Mirroring may provide no performance increase or result in a decrease of performance in a write-intensive workload environment.
Note: The UNIX operating system implements a file system cache. Since read requests can frequently be satisfied from this cache, the read/write ratio for physical I/O's through the file system can be significantly biased toward writing when compared to the read/write ratio at the application level.
- Where feasible, use disks attached to different controllers when mirroring or striping. Although most disk controllers support overlapped seeks (allowing seeks to begin on two disks at once), do not configure two plexes of the same volume on disks attached to a controller that does not support overlapped seeks. This is very important for older controllers or SCSI disks that do not do caching on the drive. It is less important for many newer SCSI disks and controllers (such as those used in most modern workstations and server machines). Mirroring across controllers may, however, be of benefit so that the system can survive a controller failure, in which case the other controller can continue to provide data from the other mirror.
- If one plex exhibits superior performance (due to being striped or concatenated across multiple disks, or because it is located on a much faster device), then the read policy can be set to prefer the "faster" plex. By default, a volume with one striped plex is configured with preferred reading of the striped plex.
Dirty Region Logging Guidelines
Dirty Region Logging (DRL) can significantly speed up recovery of mirrored volumes following a system crash. When DRL is enabled, VxVM keeps track of the regions within a volume that have changed as a result of writes to a plex by maintaining a bitmap and storing this information in a log subdisk. Log subdisks are defined for and added to a volume to provide DRL. Log subdisks are independent of plexes; they are ignored as far as the usual plex policies are concerned and are only used to hold the DRL information. Refer to Chapter 1 for a complete description of Dirty Region Logging.
Note: Using Dirty Region Logging may impact system performance in a write-intensive environment where there is not much locality of reference.
Follow these guidelines when using DRL:
- In order for Dirty Region Logging to be in effect, the volume must be mirrored.
- At least one log subdisk must exist on the volume for DRL to work. However, only one log subdisk can exist per plex.
- The subdisk that will be used as the log subdisk should not contain any necessary data.
- It is possible to "mirror" log subdisks by having more than one log subdisk (but only one per plex) in the volume. This ensures that logging can continue, even if a disk failure causes one log subdisk to become inaccessible.
- Log subdisks must be configured with 2 or more sectors (preferably an even number, as the last sector in a log subdisk with an odd number of sectors will not be used). The log subdisk size is normally proportional to the volume size. If a volume is less than 2 gigabytes, a log subdisk of 2 sectors is sufficient. The log subdisk size should then increase by 2 sectors for every additional 2 gigabytes of volume size. However,
vxassist chooses reasonable sizes by default, so you should not normally have to worry about this. In general, use of the default log subdisk length provided by vxassist is recommended.
- The log subdisk should not be placed on a heavily-used disk, if possible.
- Persistent (non-volatile) storage disks must be used for log subdisks.
Mirroring and Striping
When used together, mirroring and striping provide the advantages of both spreading data across multiple disks and providing redundancy of data.
Mirroring and striping can be used together to achieve a significant improvement in performance when there are multiple I/O streams. Striping can improve serial access when I/O exactly fits across all stripe units in one stripe. Better throughput is achieved because parallel I/O streams can operate concurrently on separate devices.
Since mirroring is most often used to protect against loss of data due to disk failures, it may sometimes be necessary to use mirroring for write-intensive workloads; in these instances, mirroring can be combined with striping to deliver both high availability and performance.
Mirroring and Striping Guidelines
Follow these guidelines when using mirroring and striping together:
- Make sure that there are enough disks available for the striped and mirrored configuration. At least two disks are required for the striped plex and one or more other disks are needed for the mirror.
- Never place subdisks from one plex on the same physical disk as subdisks from the other plex. Follow the striping guidelines described in "Striping Guidelines."
- Follow the mirroring guidelines described in "Mirroring Guidelines."
Using RAID-5
RAID-5 offers many of the advantages of using mirroring and striping together, while requiring less disk space. RAID-5 read performance is similar to that of striping and RAID-5 parity offers redundancy similar to mirroring. Disadvantages of RAID-5 include relatively slow writes.
Note: RAID-5 is not generally seen as a performance improvement mechanism except in cases of high read-to-write ratios shown in the access patterns of the application.
RAID-5 Guidelines
In general, the guidelines for mirroring and striping together also apply to RAID-5. In addition, the following guidelines should be observed with
RAID-5:
- Only one RAID-5 plex can exist per RAID-5 volume (but there can be multiple log plexes).
- The RAID-5 plex must be derived from at least two subdisks on two or more physical disks. If any log plexes exist, they must belong to disks other than those used for the RAID-5 plex.
- RAID-5 logs can be mirrored and striped.
- If the volume length is not explicitly specified, it will be set to the length of any RAID-5 plex associated with the volume; otherwise, it is set to zero. If the volume length is set explicitly, it must be a multiple of the stripe unit size of the associated RAID-5 plex, if any.
- If the log length is not explicitly specified, it will be set to the length of the smallest RAID-5 log plex that is associated, if any. If no RAID-5 log plexes are associated, it is set to zero.
- Sparse RAID-5 log plexes are not valid.
Hot-Relocation
Hot-relocation provides the advantages of automatically detecting a failure, informing the system administrator of the failure, and attempting to relocate and recover the affected redundant VxVM objects. Refer to Chapter 1 for a description of hot-relocation.
Hot-Relocation Guidelines
Follow these general guidelines when using hot-relocation:
- The hot-relocation feature is enabled by default. Although it is possible to disable hot-relocation, it is advisable to leave it on.
- Although hot-relocation does not require you to designate disks as spares, it is a good idea to designate at least one disk as a spare within each disk group; this gives you some control over which disks are used for relocation. If no spares exist, VxVM will use any available free space within the disk group. When free space is used for relocation purposes, it is more likely that there may be performance degradation after the relocation.
- After hot-relocation occurs, it is also a good idea to designate one or more additional disks as spares to augment the spare space (since some of the original spare space is probably occupied by relocated subdisks).
- If a given disk group spans multiple controllers and has more than one spare disk, it is generally a good idea to set up the spare disks on different controllers (in case one of the controllers fails).
- For hot-relocation to succeed for a mirrored volume, the disk group must have at least one disk that does not already contain one of the volume's mirrors. This disk should either be a spare disk with some available space or a regular disk with some free space.
- For hot-relocation to succeed for a mirrored and striped volume, the disk group must have at least one disk that does not already contain one of the volume's mirrors or another subdisk in the striped plex. This disk should either be a spare disk with some available space or a regular disk with some free space.
- For hot-relocation to succeed for a RAID-5 volume, the disk group must have at least one disk that does not already contain the volume's RAID-5 plex or one of its log plexes. This disk should either be a spare disk with some available space or a regular disk with some free space.
- If a mirrored volume has a DRL log subdisk as part of its data plex, that plex cannot be relocated. It is therefore advisable to place log subdisks in plexes that contain no data (log plexes).
- Hot-relocation does not guarantee that it will preserve the original performance characteristics or data layout. You should therefore examine the location(s) of the newly-relocated subdisk(s) and determine whether they should be relocated to more suitable disks to regain the original performance benefits.
- Hot-relocation is capable of creating a new mirror of the root disk if the root disk is mirrored and it fails. The
rootdg disk group should therefore contain sufficient contiguous spare or free space to accommodate the volumes on the root disk (rootvol and swapvol require contiguous disk space).
- Although it is possible to build VxVM objects on spare disks (using
vxmake
or the Visual Administrator Advanced-Ops menu),
it is preferable to use spare disks for hot-relocation only.
Performance Monitoring
There are two sets of priorities for a system administrator. One set is physical, concerned with the hardware; the other set is logical, concerned with managing the software and its operations.
Performance Priorities
The physical performance characteristics address the balance of the I/O on each drive and the concentration of the I/O within a drive to minimize seek time. Based on monitored results, it may be necessary to move subdisks around to balance the disks.
The logical priorities involve software operations and how they are managed. Based on monitoring, certain volumes may be mirrored or striped to improve their performance. Overall throughput may be sacrificed to improve the performance of critical volumes. Only the system administrator can decide what is important on a system and what tradeoffs make sense.
Best performance can generally be achieved by striping and mirroring all volumes across a reasonable number of disks, mirroring between controllers when possible. This tends to even out the load between all disks. However, this usually makes the Volume Manager more difficult to administer. If you have a large number of disks (hundreds or thousands), it may make sense to place disks in groups of 10 (using disk groups), where each group is used to stripe and mirror some set of volumes. This still provides good performance and eases the task of administration.
Getting Performance Data
VxVM provides two types of performance information: I/O statistics and I/O traces. Each type can help in performance monitoring. I/O statistics are retrieved using the vxstat utility, and I/O tracing can be retrieved using the vxtrace utility. A brief discussion of each of these utilities is included in this chapter.
Obtaining I/O Statistics
The vxstat utility provides access to information for activity on volumes, plexes, subdisks, and disks under VxVM control. vxstat reports statistics that reflect the activity levels of VxVM objects since boot time. Statistics for a specific VxVM object or all objects can be displayed at one time. A disk group can also be specified, in which case statistics for objects in that disk group only will be displayed; if no disk group is specified, rootdg is assumed.
The amount of information displayed depends on what options are specified to vxstat. For detailed information on available options, refer to the vxstat(1M) manual page.
VxVM records the following three I/O statistics:
- A count of operations
- The number of blocks transferred (one operation could involve more than one block)
- The average operation time (which reflects the total time through the VxVM interface and is not suitable for comparison against other statistics programs)
VxVM records the preceding three pieces of information for logical I/Os, including reads, writes, atomic copies, verified reads, verified writes, plex reads, and plex writes for each volume. As a result, one write to a two-plex volume results in at least five operations: one for each plex, one for each subdisk, and one for the volume. Similarly, one read that spans two subdisks shows at least four reads--one read for each subdisk, one for the plex, and one for the volume.
VxVM also maintains other statistical data. For each plex, read failures and write failures that appear are maintained. For volumes, corrected read failures and write failures accompany the read failures and write failures.
vxstat is also capable of resetting the statistics information to zero. Use the command vxstat -r to clear all statistics. This can be done for all objects or for only those objects that are specified. Resetting just prior to a particular operation makes it possible to measure the impact of that particular operation afterwards.
The following is an example of vxstat output:
                	 OPERATIONS          BLOCKS       	AVG TIME(ms)
	TYP  NAME    READ   WRITE     READ     WRITE   	READ     WRITE
vol  blop          0       0        0         0     0.0       0.0
vol  foobarvol     0       0        0         0     0.0       0.0
vol  rootvol   73017  181735   718528   1114227    26.8      27.9
vol  swapvol   13197   20252   105569    162009    25.8     397.0
vol  testvol       0       0        0         0     0.0       0.0
Additional volume statistics are available for RAID-5 configurations. See the vxstat(1M) manual page for more information.
Tracing I/O
The vxtrace command is used to trace operations on volumes. vxtrace either prints kernel I/O error or I/O trace records to the standard output or writes the records to a file in binary format. Tracing can be applied to specific kernel I/O objects types or to specified objects or devices. For additional information, refer to the vxtrace(1M) manual page.
Using Performance Data
Once performance data has been gathered, it can be used to determine an optimum system configuration in order to make the most efficient use of system resources. The following sections provide an overview of how this data can be used.
Using I/O Statistics
Examination of the I/O statistics may suggest reconfiguration. There are two primary statistics to look at: volume I/O activity and disk I/O activity.
Before obtaining statistics, consider clearing (resetting) all existing statistics. Use the command vxstat -r to clear all statistics. Clearing statistics eliminates any differences between volumes or disks that might appear due to volumes being created, and also removes statistics from booting (which are not normally of interest).
After clearing the statistics, let the system run for a while and then display the accumulated statistics. Try to let it run during typical system activity. In order to measure the effect of a particular application or workload, it should be run specifically. When monitoring a system that is used for multiple purposes, try not to exercise any one application more than it would be exercised normally. When monitoring a time-sharing system with many users, try to let statistics accumulate during normal use for several hours during the day.
To display volume statistics, use the command vxstat with no arguments. This might display a list such as:
                OPERATIONS         BLOCKS         AVG TIME(ms)
TYP  NAME      READ  WRITE      READ    WRITE     READ   WRITE
vol  archive    865    807      5722     3809     32.5    24.0
vol  home      2980   5287      6504    10550     37.7   221.1
vol  local    49477  49230    507892   204975     28.5    33.5
vol  rootvol 102906 342664   1085520  1962946     28.1    25.6
vol  src      79174  23603    425472   139302     22.4    30.9
vol  swapvol  22751  32364    182001   258905     25.3   323.2
This output helps to identify volumes with an unusually large number of operations or excessive read or write times.
To display disk statistics, use the command vxstat -d. This might display a list such as:
                 OPERATIONS        BLOCKS        AVG TIME(ms)
TYP  NAME      READ   WRITE      READ   WRITE    READ   WRITE
dm  disk01    40473  174045    455898  951379    29.5    35.4
dm  disk02    32668   16873    470337  351351    35.2   102.9
dm  disk03    55249   60043    780779  731979    35.3    61.2
dm  disk04    11909   13745    114508  128605    25.0   30.7
At times, it may make sense to move volumes from one disk to another. To move the volume archive onto another disk, first identify which disk(s) it is on using vxprint -tvh archive. This might yield the output:
V	NAME	USETYPE	KSTATE	STATE	LENGTH	READPOL	PREFPLEX
PL	NAME	VOLUME	KSTATE	STATE	LENGTH	LAYOUT	NCOL/WDTH	 	MODE
SD	NAME	PLEX	PLOFFS	DISKOFFS	LENGTH	[COL/]OFF	FLAGS
v	archive	fsgen	ENABLED	ACTIVE	204800	SELECT	-
pl	archive-01	archive	ENABLED	ACTIVE	204800	CONCAT	-	 RW
sd	disk03-03	archive-01		0	409600	204800	0	c1b0t2d0s7
Looking at the associated subdisks indicates that the archive volume is on disk disk03. To move the volume off disk03, use the command:
vxassist move archive !disk03 dest_disk
where dest_disk is the disk you want to move the volume to. It is not necessary to specify a dest_disk. If you do not, the volume will be moved to any available disk with enough room to contain the volume.
For example, use the following command to move the volume from disk03 to disk04:
vxassist move archive !disk03 disk04
This command indicates that the volume should be reorganized such that no part remains on disk03.
Note: The Visual Administrator provides an easy way to move pieces of volumes between disks and may be preferable to the command-line approach.
If there are two busy volumes (other than the root volume), try to move them so that each is on a different disk, if at all possible.
If there is one volume that is particularly busy (especially if it has unusually large average read or write times), consider striping the volume (or splitting the volume into multiple pieces, with each piece on a different disk). If done online, converting a volume to use striping requires sufficient free space to store an extra copy of the volume. If sufficient free space is not available, a backup copy can be made instead. To convert to striping, create a striped plex of the volume and then remove the old plex. For example, to stripe the volume archive across disks disk02, disk03, and disk04, use:
vxassist mirror archive layout=stripe disk02 disk03 disk04
vxplex -o rm dis archive-01
After reorganizing any particularly busy volumes, check the disk statistics. If some volumes have been reorganized, clear statistics first and then accumulate statistics for a reasonable period of time.
If some disks appear to be excessively used (or have particularly long read or write times), it may be wise to reconfigure some volumes. If there are two relatively busy volumes on a disk, consider moving them closer together to reduce seek times on the disk. If there are too many relatively busy volumes on one disk, try to move them to a disk that is less busy.
Use I/O tracing (or perhaps subdisk statistics) to determine whether volumes have excessive activity in particular regions of the volume. If such regions can be identified, try to split the subdisks in the volume and to move those regions to a less busy disk.
CAUTION�! Striping a volume, or splitting a volume across multiple disks, increases the chance that a disk failure will result in failure of that volume. For example, if five volumes are striped across the same five disks, then failure of any one of the five disks will require that all five volumes be restored from a backup. If each volume were on a separate disk, only one volume would need to be restored. Use mirroring or RAID-5 to reduce the chance that a single disk failure will result in failure of a large number of volumes.
Note that file systems and databases typically shift their use of allocated space over time, so this position-specific information on a volume is often not useful. For databases, it may be possible to identify the space used by a particularly busy index or table. If these can be identified, they are reasonable candidates for moving to non-busy disks.
Examining the ratio of reads and writes helps to identify volumes that can be mirrored to improve their performance. If the read-to-write ratio is high, mirroring could increase performance as well as reliability. The ratio of reads to writes where mirroring can improve performance depends greatly on the disks, the disk controller, whether multiple controllers can be used, and the speed of the system bus. If a particularly busy volume has a high ratio of reads to writes, it is likely that mirroring can significantly improve performance of that volume.
Using I/O Tracing
I/O statistics provide the data for basic performance analysis; I/O traces serve for more detailed analysis. With an I/O trace, focus is narrowed to obtain an event trace for a specific workload. This helps to explicitly identify the location and size of a hot spot, as well as which application is causing it.
Using data from I/O traces, real work loads on disks can be simulated and the results traced. By using these statistics, the system administrator can anticipate system limitations and plan for additional resources.
Tuning the Volume Manager
This section describes the mechanisms for controlling the resources used by the Volume Manager. Adjustments may be required for some of the tunable values to obtain best performance (depending on the type of system resources available).
General Tuning Guidelines
The Volume Manager is tuned for most configurations ranging from small systems to larger servers. In cases where tuning can be used to increase performance on larger systems at the expense of a valuable resource (such as memory), the Volume Manager is generally tuned to run on the smallest supported configuration. These tuning changes should be performed with care as they may adversely affect overall system performance or may even leave the Volume Manager unusable.
Tunables
The idtune command should be used to modify tunables. Refer to the idtune(1M) manual page for details.
The sections that follow describe specific tunables.
vol_maxvol
This value controls the maximum number of volumes that can be created on the system. This value can be set to between 1 and the maximum number of minor numbers representable in the system.
The default value for this tunable is half the value of the maximum minor number value on the system.
vol_subdisk_num
This tunable is used to control the maximum number of subdisks that can be attached to a single plex. There is no theoretical limit to this number, but for practical purposes it has been limited to a default value of 4096. This default can be changed if required.
vol_maxioctl
This value controls the maximum size of data that can be passed into the Volume Manager via an ioctl call. Increasing this limit will allow larger operations to be performed. Decreasing the limit is not generally recommended since some utilities depend upon performing operations of a certain size and may fail unexpectedly if they issue oversized ioctl requests.
The default value for this tunable is 32768 bytes (32K).
vol_maxspecialio
This tunable controls the maximum size of an I/O that can be issued by an ioctl call. The ioctl request itself may be small, but may have requested a large I/O to be performed. This tunable limits the size of these I/Os. If necessary, a request that exceeds this value may be failed, or the I/O may be broken up and performed synchronously.
The default value for this tunable is 512 sectors (256K).
vol_maxio
This value controls the maximum size of logical I/O operations that can be performed without breaking up the request. Physical I/O requests larger than this value will be broken up and performed synchronously. Physical I/Os are broken up based on the capabilities of the disk device and are unaffected by changes to this maximum logical request limit.
The default value for this tunable is 512 sectors (256K).
Raising this limit can only cause difficulties if the size of an I/O causes the process to take more memory or kernel virtual mapping space than exists and thus deadlock. Raising the limit above 512K could cause this problem and may be inadvisable.
The benefits of raising the limit significantly are also likely to be small since I/Os of 256K take sufficiently long to complete that the effects of performing multiple synchronous 256K operations as part of a larger I/O instead of just performing a single larger I/O may be unnoticeable. Lowering the limit significantly can adversely affect performance.
vol_maxkiocount
This tunable controls the maximum number of I/Os that can be performed by the Volume Manager in parallel. Additional I/Os that attempt to use a volume device will be queued until the current activity count drops below this value.
The default value for this tunable is 2048.
Since most process threads can only issue a single I/O at a time, reaching the limit of active I/Os in the kernel would require 2K I/O requests being performed in parallel. Raising this limit seems unlikely to provide much benefit except on the largest of systems.
vol_default_iodelay
This value is the count in clock ticks that utilities will pause for between issuing I/Os if the utilities have been directed to throttle down the speed of their issuing I/Os, but have not been given a specific delay time. Utilities performing such operations as resynchronizing mirrors or rebuilding RAID-5 columns will use this value.
The default for this value is 50 ticks.
Increasing this value will result in slower recovery operations and consequently lower system impact while recoveries are being performed.
voldrl_min_regionsz
With Dirty Region Logging, the Volume Manager logically divides a volume into a set of consecutive regions. The voldrl_min_regionsz tunable specifies the minimum number of sectors for a DRL volume region.
The Volume Manager kernel currently sets the default value for this tunable to 1024 sectors.
Larger region sizes will tend to cause the cache hit-ratio for regions to improve. This will improve the write performance, but it will also prolong the recovery time.
voldrl_max_drtregs
This tunable specifies the maximum number of dirty regions that can exist on the system at any time. This is a global value applied to the entire system, regardless of how many active volumes the system has.
The default value for this tunable is 2048.
The tunable voldrl_max_dtregs can be used to regulate the worse-case recovery time for the system following a failure. A larger value may result in improved system performance at the expense of recovery time.
vol_maxparallelio
This tunable controls the number of I/O operations that the vxconfigd(1M) daemon is permitted to request from the kernel in a single VOL_VOLDIO_READ per VOL_VOLDIO_WRITE ioctl call.
The default value for this tunable is 256, and it is unlikely that it is desirable to change this value.
vol_mvr_maxround
This value controls the granularity of the round-robin policy for reading from mirrors. A read will be serviced by the same mirror as the last read if its offset is within the number of sectors described by this tunable of the last read.
The default for this value is 512 sectors (256K).
Increasing this value will cause less switches to alternate mirrors for reading. This is desirable if the I/O being performed is largely sequential with a few small seeks between I/Os. Large numbers of randomly distributed volume reads are generally best served by reading from alternate mirrors.
voliot_iobuf_limit
This value sets a limit to the size of memory that can be used for storing tracing buffers in the kernel. Tracing buffers are used by the Volume Manager kernel to store the tracing event records. As trace buffers are requested to be stored in the kernel, the memory for them is drawn from this pool.
Increasing this size can allow additional tracing to be performed at the expense of system memory usage. Setting this value to a size greater than can readily be accommodated on the system is inadvisable.
The default value for this tunable is 131072 bytes (128K).
voliot_iobuf_max
This value controls the maximum buffer size that can be used for a single trace buffer. Requests of a buffer larger than this size will be silently truncated to this size. A request for a maximal buffer size from the tracing interface will result (subject to limits of usage) in a buffer of this size.
The default size for this buffer is 65536 bytes (64K).
Increasing this buffer can provide for larger traces to be taken without loss for very heavily used volumes. Care should be taken not to increase this value above the value for the voliot_iobuf_limit tunable value.
voliot_iobuf_default
This value is the default size for the creation of a tracing buffer in the absence of any other specification of desired kernel buffer size as part of the trace ioctl.
The default size of this tunable is 8192 bytes (8K).
If trace data is often being lost due to this buffer size being too small, then this value can be tuned to a more generous amount.
voliot_errbuf_default
This tunable contains the default size of the buffer maintained for error tracing events. This buffer is allocated at driver load time and is not adjustable for size while the Volume Manager is running.
The default size for this buffer is 16384 bytes (16K).
Increasing this buffer can provide storage for more error events at the expense of system memory. Decreasing the size of the buffer could lead to a situation where an error cannot be detected via the tracing device. Applications that depend on error tracing to perform some responsive action are dependent on this buffer.
voliot_max_open
This value controls the maximum number of tracing channels that can be open simultaneously. Tracing channels are clone entry points into the tracing device driver. Each running vxtrace command on the system will consume a single trace channel.
The default number of channels is 32. The allocation of each channel takes up approximately 20 bytes even when not in use.
vol_checkpt_default
This tunable controls the interval at which utilities performing recoveries or resynchronization operations will load the current offset into the kernel such that a system failure will not require a full recovery, but can continue from the last reached checkpoint.
The default value of the checkpoint is 20480 sectors (10M).
Increasing this size will reduce the overhead of checkpointing on recovery operations at the expense of additional recovery following a system failure during a recovery.
volraid_rsrtransmax
This RAID-5 tunable controls the maximum number of transient reconstruct operations that can be performed in parallel. A transient reconstruct operation is one which occurs on a non-degraded RAID-5 volume and was thus not predicted. By limiting the number of these operations that can occur simultaneously, the possibility of flooding the system with many reconstruct operations at the same time is removed, reducing the risk of causing memory starvation conditions.
The default number of these transient reconstructs that can be performed in parallel is 1.
Increasing this size may improve the initial performance on the system when a failure first occurs and before a detach of a failing object is performed, but can lead to possible memory starvation conditions.
voliomem_kvmap_size
This tunable defines the size of a kernel virtual memory region used for mapping I/O memory. This must be at least as large as (and should be larger than) voliomem_max_memory. This kernel virtual memory is allocated contiguously from kernelmap.
The default size for this tunable is 5M.
voliomem_base_memory
This tunable is the amount of memory allocated when the driver is loaded. It is intended to be large enough to support any possible single Volume Manager I/O, but no larger. More memory will be allocated as needed, but additional memory allocations are not guaranteed. If voliomem_base_memory is not large enough for an I/O, and no additional memory can be obtained, then the Volume Manager will hang.
The default size for this tunable is 512K.
voliomem_max_memory
This tunable is the maximum amount of memory that will be allocated by the Volume Manager for I/Os. This limit can be no larger than voliomem_kvmap_size. Smaller values lower the impact of the Volume Manager on other users of the system (for example, a small value ensures that more memory is available for file caching). Larger values improve Volume Manager throughput, particularly for RAID-5.
The default size for this tunable is 4M.
voliomem_chunk_size
System memory is allocated to and released from the Volume Manager using this granularity. A larger granularity reduces memory allocation overhead (somewhat) by allowing VxVM to keep hold of a larger amount of memory.
The default size for this tunable is 64K.
Tuning for Large Systems
On smaller systems with less than about a hundred drives, tuning should be unnecessary and the Volume Manager should be capable of adopting reasonable defaults for all configuration parameters. On larger systems, however, there may be configurations that require additional control over the tuning of these parameters, both for capacity and performance reasons.
Generally there are only a few significant decisions to be made when setting up the Volume Manager on a large system. One is to decide on the size of the disk groups and the number of configuration copies to maintain for each disk group. Another is to choose the size of the private region for all the disks in a disk group.
Larger disk groups have the advantage of providing a larger free-space pool for the vxassist(1M) command to select from, and also allow for the creation of larger arrays. Smaller disk groups do not, however, require as large a configuration database and so can exist with smaller private regions. Very large disk groups can eventually exhaust the private region size in the disk group with the result that no more configuration objects can be added to that disk group. At that point, the configuration will either have to be split into multiple disk groups, or else the private regions will have to be enlarged; this involves re-initializing each disk in the disk group (and may involve reconfiguring everything and restoring from backup).
A general recommendation for users of disk array subsystems is to create a single disk group for each array such that the disk group can be physically moved as a unit between systems.
Changing the Number of Configuration Copies for a Disk Group
The selection of the number of configuration copies for a disk group is based entirely on the trade-off between redundancy and performance. As a general (though non-linear) rule, the fewer configuration copies that exist in a disk group, the quicker the group can be initially accessed, the faster the initial start of vxconfigd(1M) can proceed, and the quicker transactions can be performed on the disk group.
CAUTION�! The risk of lower redundancy of the database copies is the loss of the configuration database. Loss of the database results in the loss of all objects in the database and thus all data contained in the disk group.
The default policy for configuration copies in the disk group is to allocate a configuration copy for each controller identified in the disk group, or for each target containing multiple addressable disks on the same target. This is generally quite sufficient from the redundancy perspective, but can lead to large numbers of configuration copies under some circumstances.
If this is the case, it is recommended to limit the number of configuration copies to a minimum of 4. The location of the copies will be selected as before, according to maximal controller or target spread.
The mechanism for setting the number of copies for a disk group is to use the vxdg init command for a new group setup (see the vxdg(1M) manual page for details). Alternatively, an existing group's copies can be changed by use of the vxedit set command (see the vxedit(1M) manual page for details). For example, to set a disk group called foodg to contain 5 copies, the following command can be given:
vxedit set nconfig=5 foodg
[Next] [Previous] [Top] [Contents] [Index]