[Next] [Previous] [Top] [Contents] [Index]
VxVM User's Guide
Getting Started
Chapter 3
Introduction
This chapter provides instructions on starting the Visual Administrator and performing some basic operations using this graphical user interface.
Topics covered in this chapter include:
The quick reference sections at the end of this chapter provide information on Visual Administrator menus and forms related to the topics discussed in this chapter.
Initializing the Visual Administrator
Before starting the Visual Administrator, both the Volume Manager and the Visual Administrator must be properly installed. In addition, the Volume Manager configuration daemon (vxconfigd) must be running and enabled. If you have followed the procedures outlined in the Online Data Manager overview and installation topic, these conditions should already be met.
To run the Visual Administrator from the command line, your PATH environment variable needs to contain /opt/vxvm-va/bin. If necessary, update PATH to include /opt/vxvm-va/bin before attempting to run the Visual Administrator.
- If using a Bourne Shell (
sh or ksh), update PATH to reflect
/opt/vxvm-va/bin with the commands:
	PATH=${PATH}:/opt/vxvm-va/bin
	export PATH
- If using a C Shell (
csh or tcsh), update PATH to reflect
/opt/vxvm-va/bin with the command:
setenv PATH ${PATH}:/opt/vxvm-va/bin
Demo Mode
A demo mode is provided so that you can experiment with the Visual Administrator without using a real system. Demo mode sets up a series of dummy disks on which most Visual Administrator operations can be performed. However, file system operations and basic disk operations are not accessible in demo mode and are therefore greyed out in the Basic-Ops menu.
In demo mode, the view window titles include the string (DEMO). In real mode, the view window titles include the string (hostname).
User-created configurations are maintained between demo-mode sessions. However, you can run the /opt/vxvm-va/bin/vxva_setup script at any time to clean up demo mode configurations and return to the default demo configuration.
Command Line Startup
vxva can be run in real mode or in demo mode.
Note: Only users with appropriate privileges can run the Visual Administrator in real mode. Demo mode requires no special privileges.
The system owner or superuser can use the following command to give a user the privilege to run vxva in real mode:
/opt/vxvm-va/install/SetVAPrivilege user-id
where user-id is the user's login name.
Start the Visual Administrator from the command line in either of the following ways:
- >>To run the Visual Administrator in real mode, enter the following line at the prompt:
# /sbin/tfadmin vxva &
- >>To run the Visual Administrator in demo mode, enter the following line at the prompt:
vxva -t &
A temporary window appears to inform you that the Visual Administrator is starting up.
The Visual Administrator Main Window
The Visual Administrator main window appears immediately after the Visual Administrator is properly invoked (see Figure 44).
Figure 44 Visual Administrator Main Window
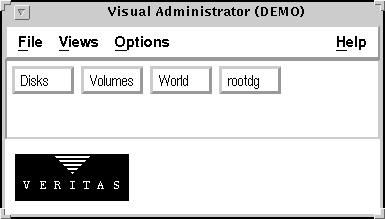
The Visual Administrator main window provides access to view windows and allows you to do any of the following:
- exit the Visual Administrator through the File menu
- add, rename, or remove user-created views through the Views menu
- set user preferences through the Options menu
- open a help facility window through the Help menu
- open the View of Disks window with the Disks view button
- open the View of Volumes window with the Volumes view button
- open the View of World window with the World view button
- open the View of
rootdg window with the rootdg view button
From any view window, the Basic-Ops or Advanced-Ops menu can be used to create new Volume Manager objects (represented by icons) or to manipulate existing icons.
Manipulating Icons
This section introduces the basic ways in which icons can be manipulated with the Visual Administrator. Icons can be manipulated in various ways using the mouse buttons, menus, and forms.
Selecting Icons
Select a single icon as follows:
- 1. Place the pointer over the desired icon.
- 2. Click the LEFT mouse button.
Select multiple icons simultaneously as follows:
- 1. Place the pointer over an icon.
- 2. Click the MIDDLE mouse button.
- 3. Place the pointer over another icon and click the MIDDLE mouse button again.
- 4. Repeat the previous step until all desired icons are selected.
The icon changes its color or bitmap pattern to indicate that it has been selected and to distinguish itself from unselected icons.
Note: Since some Visual Administrator icons contain other icons, it is important to place the pointer on a portion of the icon to be selected that is not covered by part of another icon.
De-selecting Icons
De-select an icon as follows:
- 1. Place the pointer over a selected icon.
- 2. Click the MIDDLE mouse button.
Dragging and Dropping Icons
Icons can be manipulated by dragging them and then dropping them elsewhere (such as in a different view window or on top of another icon).
Drag an icon as follows:
- 1. Place the pointer over the icon.
- 2. Hold down the LEFT button while moving the mouse.
An outline of the icon follows the movement of the mouse and pointer.
Drop an icon as follows:
- 1. Position the icon in a different location or on top of another icon.
- 2. Release the LEFT button to drop the icon.
The end result of this kind of manipulation depends on both the type of icon being moved and its destination. For further details on dragging and dropping icons, refer to the section on the drag and drop style of operation in Chapter 2, "Description of the Visual Administrator."
Using the Icon Menu
A set of icon-related options can be accessed with the Icon menu located in the menu bar of each view window.
The following is a summary of the icon-related options available through this menu:
- Maximize Icons -- Restores the selected minimized icon(s) to its full size so that it shows all of its sub-icons.
- Minimize Icons -- Shrinks the selected icon(s) in size and hides all of its sub-icons.
- Maximize All Icons -- Restores all icons in the current view window at once so that they show all of their sub-icons.
- Minimize All Icons -- Shrinks all icons in the current view window at once, so that all of their sub-icons are hidden.
- Create Icons -- Creates a copy of the icon(s) selected from another view and places the icon copy in the current user-created view.
- Remove Icons -- Removes the selected icon(s) from the current user-created view.
Performing Basic Operations
The Visual Administrator basic operations are provided to perform administrative operations relatively quickly and easily. The basic operations use free space management techniques to automatically locate available space for the desired operation, unless you specify some suitable disk space.
Access the Visual Administrator's basic operations as follows:
- >>Use the LEFT mouse button to access the Basic-Ops menu (see Figure 45).
Figure 45 Basic-Ops Menu

- The Basic-Ops menu provides cascading menus for the following operations:
- File System Operations -- Perform operations involving general file system maintenance. File systems can be created, mounted and unmounted, resized, and backed up.
- Volume Operations -- Perform operations involving general volume maintenance. Volumes can be created from Volume Manager disks, removed, mirrored, resized, and backed up.
- Disk Operations -- Perform operations involving general disk maintenance. Disks can be initialized, removed, or replaced.
Note: File system operations and basic disk operations are not simulated by the Visual Administrator in demo mode, so are only accessible in real mode. The advanced disk operations are, however, accessible in demo mode.
Performing Advanced Operations
The Visual Administrator advanced operations are provided to manipulate Volume Manager entities manually. It is necessary to use the Advanced-Ops menu for those operations that are not available via the Basic-Ops menu.
Be sure you have a solid understanding of Volume Manager concepts before you try to create and manipulate volumes using the Advanced-Ops menu. Refer to Chapter 1, "Description of the Volume Manager" for background information, if necessary.
Access the Visual Administrator's advanced operations as follows:
- >>Use the LEFT mouse button to access the Advanced-Ops menu (see Figure 46).
Figure 46 Advanced-Ops Menu
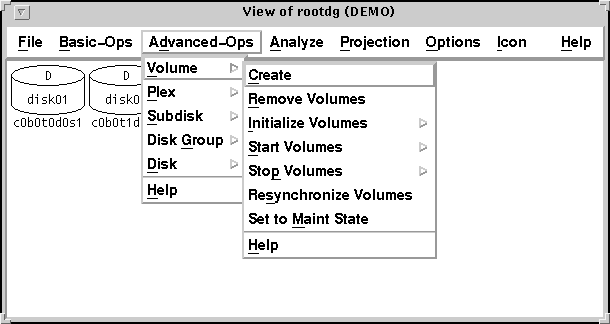
- The Advanced-Ops menu provides cascading menus for the following operations:
- Volume -- Perform operations on one or more volumes. Possible operations include creating a new volume, removing a volume, and changing the state of an existing volume.
- Plex -- Perform operations on one or more plexes (mirrors). Possible operations include creating a new plex, removing a plex, associating a plex with a volume, disassociating a plex from a volume, and detaching a plex.
- Subdisk -- Perform operations on one or more subdisks. Possible operations include creating a new subdisk, removing a subdisk, associating a subdisk with a plex, disassociating a subdisk from a plex, and joining or splitting subdisks.
- Disk Group -- Perform operations on disk groups. Possible operations include creating a new disk group, adding disks to a disk group, and removing disks from a disk group.
- Disk -- Perform operations on disks. Possible operations include initializing a disk, removing a disk from VxVM control, and onlining or offlining a disk.
Checking Free Space
For operations that require free disk space, the Volume Manager and Visual Administrator usually allow you to designate disks with sufficient free space. If no disks are specified, disks with available space are automatically used when an operation is performed via the Basic-Ops menu. With Advanced-Ops, however, you are expected to designate disks with sufficient space.
Before designating a disk to be used, verify the amount of free space on that disk.
To check the available free space on a disk:
- >>Click the RIGHT button on a portion of the VM disk icon that is not covered by another icon.
- The VM disk properties form appears. A field at the bottom of the form indicates the maximum free space available on this disk. For detailed information on the VM disk properties form, refer to Table 28 in Chapter 4, "Disk Operations".
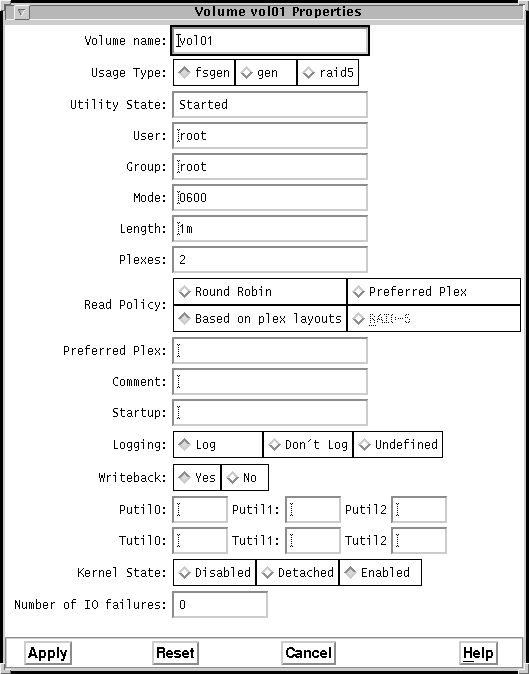
Displaying Properties of an Object
The properties of the object corresponding to a given icon can be displayed (and potentially adjusted) in a properties form. Properties forms provide detailed information about the characteristics of a particular object.
Properties forms exist for:
- physical disks
- partitions
- VM disks
- volumes
- plexes
- subdisks
- file systems
Since file systems are not represented by icons, the file system properties form is accessed through the File System Operations menu. If the file system is mounted, the file system properties form can be accessed by clicking RIGHT on the mount point name that appears below its volume icon.
To access a properties form for an icon:
- >>Move the pointer over the icon and click the RIGHT button (if the icon is under analysis, Shift-RIGHT must be used instead).
- When the properties form appears, details of the icon's configuration are displayed. Some of the displayed properties can be altered directly through this form by altering the appropriate fields and then selecting the form's Apply button. Selecting the Reset button converts any altered form fields back to their values at the time when the form was popped up.
Figure 47 shows a typical properties form.
Figure 47 Properties Form
Renaming Objects
To rename an object:
- 1. Move the pointer over the icon corresponding to the object to be renamed and click the RIGHT button (if the icon happens to be under analysis, Shift-RIGHT must be used instead).
- The object's properties form appears.
- 2. Alter the name field for that object.
- 3. Click the LEFT mouse button on the Apply button at the bottom of the form.
- The icon corresponding to the renamed object will adjust its name accordingly.
Note: Be sure that no application is accessing the object by its old name when you are renaming it.
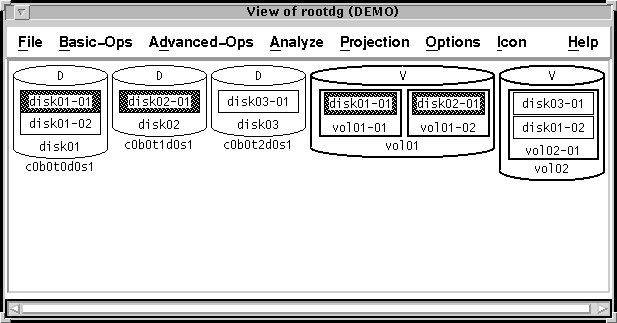
Invoking Projection on Objects
Projection is the technique the Visual Administrator uses to show relationships between icons that represent Volume Manager objects. Projection is illustrated using color (yellow is the default) or bitmap patterns. Projection highlights those objects that the selected object is composed of and illustrates the relationship between the objects. For example, if a volume is selected for projection, the corresponding subdisks are highlighted within the volume icon and also on the appropriate disk icons. If the selected icon has no associated objects, the Visual Administrator issues a warning to this effect.
To show the projection for a particular icon:
- >>Click the MIDDLE button on the icon while holding down the Shift key (Shift-MIDDLE).
To stop projection of a particular icon:
- >>Click Shift-MIDDLE on the icon again.
Projection can also be started or stopped by selecting an icon and then using the Icon Projection sub-menu of the Projection menu. For detailed information on projection menus, refer to Table 12.
Projection can be requested in any view. When an icon is highlighted by projection, all icons representing that object in all view windows where it appears are highlighted.
Table 9 summarizes the projection relationships that are highlighted for particular icon types. If no icons of the correct type are associated with the selected icon, then nothing is highlighted.
Table 9
Projection Behavior
Icon Selected | Icons Highlighted |
| Volume | All subdisks associated with any plex associated with the volume. |
| Plex | All subdisks associated with the plex. |
| Subdisk | Associated plex and volume, and all other subdisks associated with the plex. |
| VM Disk | All plexes associated with the subdisks that reside on the disk. |
| Physical Disk | All associated partition and VM disk icons. |
| Partition | The VM disk associated with the partition. |
When projection is turned on and left on from two different objects, any icon that happens to be related to both of these objects receives two "layers" of projection highlighting. Projection must then be turned off from both objects that started it (or all projection in the current session must be stopped) before the double-highlighted icon returns to its normal state. For example, if projection is turned on from both a volume and a plex related to the same subdisk, then that subdisk is highlighted twice even though it only appears to have one layer of highlighting.
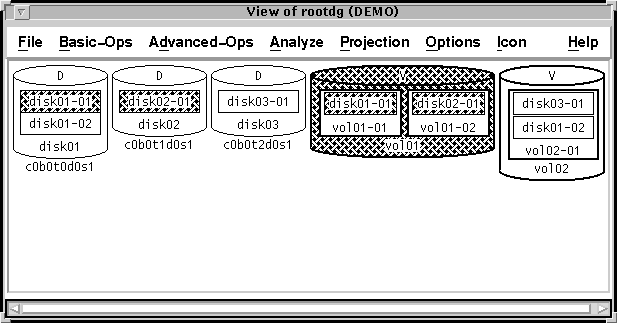
Figure 48 illustrates highlighting that results from the selection of a volume icon (vol01) for projection.
Figure 48 Projection
Displaying Activity Levels on Objects
Through analysis, the Visual Administrator displays statistics about the performance of Volume Manager objects. These statistics are displayed both visually (with different colors or patterns), and numerically (with pop-up statistics forms). Analysis displays activity levels on selected icons representing Volume Manager objects. Analysis statistics can be written to a log file using the Analysis Parameters form (for detailed information on this form refer to Table 14). When a log file is specified, time-stamped statistics are written to the file at each interval in binary format. Since statistics can only be collected on volumes, only subdisks that are associated with volumes, and disks associated with subdisks associated with volumes, can be analyzed. For detailed information on the Analysis Statistics form, refer to Table 15.
Note: Only volume and VM disk icons can be selected for analysis.
To start analysis:
- 1. Select one or more VM disk and/or volume icons.
- 2. Select Start from the Analyze menu.
Volumes, VM disks, and subdisks that are associated with the selected icon(s) change their colors or patterns to reflect their relative activity levels (high, medium, or low). Figure 49 shows typical analysis for a selected volume (vol01).
Figure 49 Analysis
To stop analysis:
- 1. Select the icons on which analysis is to stop.
- 2. Select Stop from the Analyze menu.
Analysis Table
On a color display, the icons being analyzed are colored depending on their statistics. On a monochrome display, analysis is depicted with bitmap patterns instead of colors.
Using the Analysis Parameters form (see Table 14), you can specify how you want the statistics to correspond to Low, Medium, and High ranges. The default colors and patterns can also be changed using the X resources for the Visual Administrator. See Appendix A, "X Resources for the Visual Administrator" for information on these resources.
The following table summarizes the default colors and patterns associated with the various levels of analysis.
Table 10
Analysis Table
Analysis Level | Color | Bitmap Pattern |
| Low | green | cross_weave |
| Medium | yellow | root_weave |
| High | red | wide_weave |
Changing Options
Most Visual Administrator windows contain an Options menu, which allows you to specify preferences for Visual Administrator operations.
To access this menu:
- >>Click the LEFT mouse button on Options in a window's menu bar or press Alt-o (or Meta-o) within a window displaying this option.
- Some of the preferences listed have associated cascading menus that require further selection.
User preferences are saved in the file $HOME/.vxva_pref so that they are retained across Visual Administrator sessions.
The preferences that can be set through the Options menu are:
- Show Command
- When Commands are Ready
- Logging
- Popup the Command Window
- Format of Size
- Help
Some of the available preference settings relate to the Command Info Window. This is a special window that displays the command history, along with the status and results of those commands.
Show Command
This specifies whether the Command Info Window is to be shown before every command is executed (Show at Start), or only when a command fails (Show on Error). If no preference is indicated, the default is Show on Error.
When Commands are Ready
This specifies what the Visual Administrator should do when it is ready to run a Volume Manager or system command. The command can either be run immediately (Execute Commands), or brought up in the Command Info Window for inspection (Show Commands Only). If no preference is indicated, the default is Execute Commands.
If Show Commands Only is selected, the command corresponding to a Visual Administrator operation is displayed but it is not executed. No changes are made to the existing configuration and analysis is unaffected. This option makes it possible to preview the VxVM or system command underlying a specific Visual Administrator operation. The command can then be executed directly from the Command Info Window once it is approved.
Logging
This indicates whether command logging should be used. Logging keeps a record on disk of all commands sent to the Volume Manager or the system by the Visual Administrator. Logging can be started (Start) or stopped (Stop) at any time. When started, a window requesting a log file name appears and a file name must be entered; the Apply button must then be selected to start logging with the designated file. If no preference is indicated, the default is Stop and no logging is in effect. For detailed information on the Log File form, refer to Table 17.
Note: Unlike other user preferences, the logging setting is not saved across Visual Administrator sessions.
Popup the Command Window
This option is used to bring up the Command Info Window on demand. This window displays the command history, along with the status and results of those commands. Commands can also be executed or repeated from this window. The Command Info Window is discussed in more detail in a later section.
Format of Size
This specifies the units in which size-related output should be displayed (gigabytes, megabytes, kilobytes, or sectors). The format of size applies to output only and is set to megabytes until you reset it.
In properties forms, length values are displayed as a number followed by a g, m, k, or s (representing gigabytes, megabytes, kilobytes, or sectors, respectively). If the size cannot be cleanly converted into gigabyte, megabyte, or kilobyte format, it is displayed in sectors instead.
Note: The preferred format of size does not apply to input. Input typically defaults to sectors (s), unless gigabytes (g), megabytes (m), or kilobytes (k) are specified. Sizes must be specified as whole numbers.
Displaying Past and Present Commands
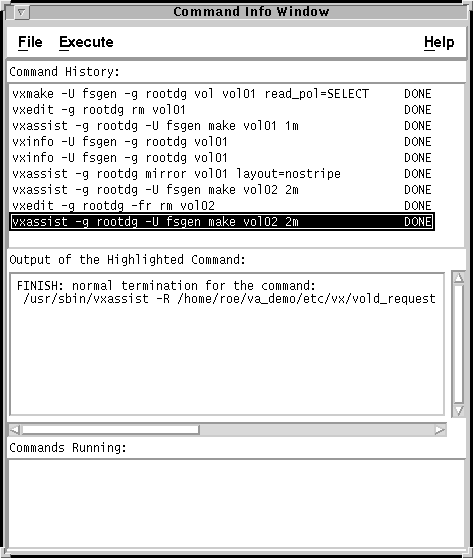
The Command Info Window displays commands that are currently being executed by the Visual Administrator, as well as previous commands. Both Volume Manager and system commands are displayed in this window as they are invoked by the Visual Administrator. The status and output of these commands are also displayed here. Previously executed commands can be executed again directly from this window.
Figure 50 illustrates the Command Info Window.
Figure 50 Command info Window
Command Info Sections
The Command Info Window is divided into three sections:
- Command History
- Output of the Highlighted Command
- Commands Running
Command History
This section displays a chronological listing (or history) of the commands sent to the Volume Manager or the system for execution. The last ten commands are saved and displayed, with the most recent command at the bottom. If a command is too long, only the first few arguments of the command are shown. Each of these commands is listed along with its status, which is displayed to the right of the command. The status of a command is one of the following:
DONE -- Command successfully completed.
BROWSE -- Command not executed, just displayed here.
ERROR -- Command terminated with error condition.
UNKNOWN -- Command status cannot be determined by the Visual Administrator (this rarely occurs, but generally results from an internal Visual Administrator error or a command being interrupted unexpectedly).
Output of the Highlighted Command
When a command is highlighted in the Command History section, its output information is displayed in the Output of the Highlighted Command section of the window. The results of the command are indicated here (regardless of whether it succeeded or failed), along with the full command. If the command terminated abnormally or exited with an error condition, the error message is also displayed.
Commands Running
This section displays the command that is currently running. This command has been sent to the system or the Volume Manager, but has not yet terminated. As soon as the command completes, it disappears from this section of the window and is placed at the bottom of the Command History section.
Using the Command Info Window
The Command Info Window is accessed by selecting Popup the Command Window from the Options menu. This window may also pop up automatically when an error occurs with a command or operation. The Command Info Window can be safely closed by selecting Close from its File menu.
A command can be executed directly from the Command Info Window, as follows:
- 1. Select a command by clicking LEFT on the desired command in the Command History window.
- Once selected, the command is highlighted.
- 2. Access the Execute menu and select the Execute option.
This procedure sends the selected (highlighted) command to the system or the Volume Manager for execution. This is useful for executing a command again, re-executing a failed command that should now succeed, or executing a command that was only shown (in Browse status) before.
In some circumstances, the Execute with Force option may be used rather than Execute. This option adds -f to the executed command, which forces the Volume Manager to complete an operation that is considered unsafe and to disregard error messages. The -f option is available with some Volume Manager commands only and does not apply to file system operations.
Note: The Execute with Force option is a very dangerous operation, which can result in irreparable loss of data; it should only be used when you are sure that an operation should succeed, even though Volume Manager error checking prevents it.
For detailed information on the Execute option, refer to Table 18.
Quitting the Visual Administrator
Most Visual Administrator windows contain a File menu. This menu contains one or both of the following options:
- Close -- Close the current window only.
- Exit -- Exit both the current window and Visual Administrator completely.
To end a Visual Administrator session, click LEFT on the File option in the menu bar area of the Visual Administrator main window (or any other window) and select Exit. A dialog box appears to confirm that the Visual Administrator session is to be closed completely.
Note: If the window manager is set up with a window menu, accessing that menu from the Visual Administrator main window and selecting Exit will also end the Visual Administrator session. However, closing any other Visual Administrator window through the window manager will only close that particular window.
For detailed information on quitting the Visual Administrator session using the file menu options, refer to Table 19.
Quick Reference to Visual Administrator Menus and Forms
The following sections list and describe the menus and forms associated with the topics discussed in this chapter.
Icon Menus
The following menu selections are accessed via the Icon menu.
Table 11
Icon Menus
Menu /Submenu Access | Description |
| Icon > Maximize Icons | Restores the selected minimized icon(s) to its full size, making it show all of its sub-icons. Requirements: * At least one minimized icon must be selected. |
| Icon > Minimize Icons | Shrinks the selected icon(s), making it smaller in size. In effect, all of its sub-icons are hidden. Minimized icons occupy less space and are displayed with their names in reverse type. Requirements: * At least one maximized icon must be selected. |
| Icon > Maximize All Icons | Restores all icons in the current view window, making them show all of their sub-icons. No icons need to be selected. |
| Icon > Minimize All Icons | Shrinks all icons in the current view window, making them hide all of their sub-icons. No icons need to be selected. |
| Icon > Create Icons | Creates a copy of the icon(s) selected from another view and places the new copy in the current user-created view. Icons that already exist in this user-created view will not be duplicated. Requirements: * This option is only available in user-created views. |
| Icon > Remove Icons | Removes the selected icon(s) from the current user-created view. Requirements: * This option is only available in user-created views. |
| Icon > Help | Accesses a Help window that displays relevant information on icon menu operations. |
Projection Menus
Icon projection provides you with visual information about the relationships between icons. When projection is started for an icon, all other icons (representing Volume Manager objects) associated with that particular one are highlighted, no matter which views they occupy. Icons can be placed under projection either individually or in multiples. Projection highlighting can accumulate on a given icon when that icon is undergoing projection from more than one source.
Projection operations are accessed through the Projection menu. This menu is located in view windows such as View of rootdg. The Projection menu can be used to start or stop projection, as well as to highlight any free subdisk icons. Projection can also be started or stopped by pressing Shift-MIDDLE with the pointer positioned on the desired icon. The following menus are accessed via the Projection menu.
Table 12
Projection Menus
Menu/Submenu Access | Description |
| Projection > Icon Projection | Provides access to projection options used to start or stop projection for icons. |
| Projection > Icon Projection > Start | Starts projection for the selected icon(s). When projection is started, all icons related to the selected icon(s) are highlighted. Highlighting occurs for related icons in any view windows. If the selected icon has no associated objects, the Visual Administrator issues a warning to this effect. Requirements: * At least one icon must be selected. * The selected icon(s) must be associated with at least one other icon in order for projection to take effect. |
| Projection > Icon Projection > Stop | Stops projection for the selected icon(s). When projection is stopped, all icons related to the selected icon(s) lose their projection highlighting. Requirements: * At least one icon must be selected. If the selected icon is not undergoing projection, the Visual Administrator ignores the stop request. |
| Projection > Icon Projection > Stop All | Stops projection for all icons that are currently undergoing projection. |
| Projection > Icon Projection > Help | Accesses a Help window that displays relevant information on icon projection operations. |
| Projection > Show Free Subdisks | Determines whether free subdisks should be highlighted or not. When Show Free Subdisks is turned on, the Visual Administrator highlights all unassociated subdisks (representing unallocated disk space). Once turned on, any future free subdisks are automatically highlighted. Free subdisk icons can be used by designating them to objects, but the Volume Manager cannot automatically use free subdisks as free space. Free subdisk projection is either started or stopped across all Visual Administrator views. The start or stop preference is also retained for a particular user in future Visual Administrator sessions. From the Show Free Subdisks menu, a cascading menu allows you to indicate whether or not to highlight free subdisks. |
| Projection >Show Free Subdisks > Start | Starts highlighting free subdisks immediately and continue to do so until instructed to stop. |
| Projection >Show Free Subdisks > Stop | Stops highlighting free subdisks. |
| Projection >Show Free Subdisks > Help | Accesses a Help window that displays relevant information on show free subdisks operations. |
| Projection >Help | Accesses a Help window that displays relevant information on projection operations such as disks and show free subdisks. |
Analysis Menus
Analysis is the Visual Administrator's way of displaying statistics on the performance of various Volume Manager objects.
Statistics are displayed both visually (using color or pattern) and numerically (using pop-up statistics forms).
Analysis operations are accessed through the Analyze menu. This menu is located in view windows such as View of rootdg. The Analyze menu can be used to start or stop analysis, as well as to set analysis-related preferences.
The following menus are accessed through the Analyze menu.
Table 13
Analysis Menus
Menu/Submenu Access | Description |
| Analyze > Start | Begins analysis of the selected icon(s). These icons are added to the list of objects being analyzed. Only volume and VM disk icons can be analyzed. Once analysis is activated, the selected icons begin to display information about their performance characteristics using color or bitmap patterns. Requirements: * At least one volume or VM disk icon must be selected. |
| Analyze > Stop | Terminates analysis of the selected icon(s). These icons are removed from the list of objects being analyzed. When analysis stops, the selected icons return to their pre-analysis states. When analysis is stopped for one icon, other icons undergoing analysis are not affected. Requirements: * At least one volume or VM disk icon must be selected. * The selected icon(s) must be undergoing analysis. |
| Analyze > Analyze All | Begins analysis on all volumes and VM disk icons in all view windows. Once analysis is activated, all icons begin to display information about their performance characteristics using color or bitmap patterns. |
| Analyze > Stop All | Automatically terminates analysis of all icon(s) in all view windows. All icons return to their pre-analysis states. All colors and patterns disappear. Requirements: * Analysis must be in effect. |
| Analyze > Parameters | Accesses the Analysis Parameters form, which is used to set your preferences for how analysis is to be conducted. Requirements: * For each set of high/low parameters, the high parameter must be greater than the low parameter. * You must have access to the specified log file. See Also: * Analysis Parameters Form (Table 14) |
| Analyze > Help | Accesses a Help window that displays relevant information on analyze operations. |
Analysis Parameters Form
This form, which is accessed via the Analyze menu, is used to set user preferences for conducting analysis.
Table 14
Analysis Parameters Form
Field | Description |
| Sample Rate: | Determines the time interval between data samples. This field is divided into two sections: the slider bar is used to select the interval (1-60) and the menu to its right is used to select units of time (seconds or minutes). The default is 5 seconds. A shorter interval means the data will be updated more often, but is also a higher load on the system. |
| Volume Parameters: | Specifies in I/Os per second the high and low values that decide the coloring (or pattern) of the volume icons. |
| Disk Parameters: | Specifies in I/Os per second the high and low values that decide the coloring (or pattern) of the VM disk icons. |
| Subdisk Parameters: | Specifies in I/Os per second the high and low values that decide the coloring (or pattern) of the subdisk icons. |
| Log File: | The name of the file to be used for the statistics log. If the file does not already exist, it will be created. The file name is taken to be relative unless a pathname is given. To stop logging to the file, the file name text in this field must be erased. This field is optional. This log file is a binary file. To view the log file, /opt/vxvm-va/bin/vxvalog2txt filename must be run on this file to process it for viewing. |
Analysis Statistics Form
This form displays analysis statistics relevant to the selected volume or VM disk icon. This form applies only to volume or disk icons that are undergoing analysis. Click the RIGHT mouse button on desired icon that is being analyzed. All fields in this form are read only and cannot be changed.
Table 15
Analysis Statistics Form
Field | Description |
| Reads: | The number of times the object was read from during the last interval. |
| Writes: | The number of times the object was written to during the last interval. |
| Total R/W: | The total number of reads and writes during the last interval. |
| Blocks Read: | The number of disk blocks read from the object during the last interval. |
| Blocks Written: | The number of disk blocks written to the object during the last interval. |
| Total Blocks: | The total number of blocks read from or written to the object during the last interval. |
| Avg Read Time (ms): | The average time, in milliseconds, that it took for a read operation to complete. This is equal to the number of reads during the last interval divided by the total time spent on reads. |
| Avg Write Time (ms): | The average time, in milliseconds, that it took for a write operation to complete. This is equal to the number of writes during the last interval divided by the total time spent on writes. |
| Interval (secs): | The actual time, in seconds, since the last data was sampled. This may vary slightly from the specified interval time due to uncontrollable variances from system to system. |
Options Menus
User preferences for how the Visual Administrator should operate are set via the Options menu. After you have set your preferences, they are saved to the file $HOME/.vxva_pref. You should not edit this file. Once set, these preferences are maintained across future Visual Administrator runs.
The following menus are accessed via the Options menu.
Table 16
Options Menus
Menu /Submenu Access | Description |
| Options > Show Command | Specifies whether the Command Info Window is to be displayed before each command is executed or only upon command failure. |
| Options > Show Command > Show on Error | Displays the Command Info Window only when a Volume Manager or system command has failed. This is the default behavior. |
| Options > Show Command > Show at Start | Displays the Command Info Window whenever a Volume Manager or system command is ready to be sent. Enables you to view the actual command(s) being executed via Visual Administrator. |
| Options > Show Command > Help | Accesses a Help window that displays relevant information on show command operations. |
| Options > When Commands Are Ready | Specifies whether commands should be executed immediately or simply displayed for your review. |
Options > When Commands Are Ready
> Execute Commands | Automatically executes commands as soon as they are issued. This is the default behavior. |
Options > When Commands Are Ready
> Show Commands Only | Displays commands in the Command Info Window for your review rather than executing them. Upon approval, you can execute the displayed command directly from the Command Info Window by highlighting that command and then using the Execute menu. |
| Options > When Commands Are Ready > Help | Accesses a Help window that displays relevant information on command ready operations. |
| Options > Logging | Starts or stops logging of Visual Administrator commands. Logging records all commands sent to the Volume Manager or the system by the Visual Administrator in a specified file. From the Logging menu, a cascading menu allows you to indicate whether logging should be activated or deactivated. Unlike other user preferences, the logging setting is not saved across Visual Administrator sessions. See Also: * Log File Form (Table 17) |
| Options > Logging > Start | Begins recording all commands to a log file. A log file is created if one does not already exist. The file to be used for logging must be specified in the resulting form. If the file exists, you must have permission to write to that file. The log information will be appended to the end of the specified file. |
| Options > Logging > Stop | Stops recording all commands to the log file. When logging is discontinued, you are responsible to remember the name of the log file that was used. |
| Options > Logging > Help | Accesses a Help window that displays relevant information on logging operations. |
| Options > Popup the Command Window | Accesses and displays the Command Info Window. This window displays current and previous commands, along with the status of each command. Once accessed in this way, the Command Info Window remains visible until it is closed via its File menu. See the "Displaying Past and Present Commands" section for further details. |
| Options > Format of Size | Specifies the units (gigabytes, megabytes, kilobytes, or sectors) to be used for size-related output. The unit of size is set to megabytes until you reset it. In properties forms, length values are displayed as gigabytes (g), megabytes (m), kilobytes (k), or sectors (s). If the size cannot be cleanly converted into gigabytes, megabytes, or kilobytes, it is displayed in sectors instead (even though another format of size preference may be set). The preferred format of size applies to output only and does not impact input in any way. Input typically defaults to sectors, unless gigabytes, megabytes, or kilobytes are specified. |
| Options > Format of Size> Gbytes | Use gigabytes when displaying size-related output. |
| Options > Format of Size> Mbytes | Use megabytes when displaying size-related output. |
| Options > Format of Size> Kbytes | Use kilobytes when displaying size-related output. |
| Options > Format of Size> Sectors | Use sectors when displaying size-related output. |
Options Log File Form
The Log File Form accessed via the Options menu, is used for logging purposes.
Table 17
Log File Form
Field | Description |
| Log File: | The name of the file (and path name) to be used to store the command log. If no path is specified, the file is created in the directory from which the Visual Administrator session was started. Requirements: * You must have permissions appropriate to access and write to the named file (and any directories in its path). * If a path name is included, it must be valid. |
Execute Menus
In addition to viewing or previewing commands, the Command Info Window can be used to execute commands directly through its Execute menu. This is useful for re-executing commands or for executing commands that were previously only shown in this window.
Table 18
Execute Menus
Menu /Submenu Access | Description |
| Execute > Execute | Execute the command highlighted in the Command History section of the window. Visual Administrator sends the highlighted command to the Volume Manager or the system for execution. Requirements: * A single command in the Command History section of the window must be highlighted. |
| Execute > Execute With Force Option | Forcefully executes the Volume Manager command highlighted in the Command History section of the window (using the -f option). This option effectively forces the Volume Manager to complete an operation that is considered unsafe and should therefore be used only when you are certain that an operation should be performed in this way. This is a dangerous operation, which can cause irreparable loss of data and should only be used when absolutely necessary. Requirements: * The force option works for some Volume Manager commands only (those that take the -f option). The -f option does not apply to file system operations offered through Visual Administrator. * This option should only be used when you are sure that an operation should succeed, even though Volume Manager error checking prevents it. |
File Menus
Most Visual Administrator windows contain a File menu, which is used to exit that particular Visual Administrator window and/or to exit the Visual Administrator session completely.
The following menu selections are accessed via the File menu.
Table 19
File Menus
Menu /Submenu Access | Description |
| File > Close | Closes the current window only. |
| File > Exit | Both closes the current window and exits Visual Administrator completely. Although the Visual Administrator session is closed down, user preferences set during the session are retained. Since Visual Administrator operations are applied to the Volume Manager configuration as they are issued, quitting a Visual Administrator session has no effect on the configuration and does not undo any changes made through Visual Administrator. |
[Next] [Previous] [Top] [Contents] [Index]